Decision Editor
The Decision Editor is the primary means to define a set of business rules in the form of DMN Decision Tables. This form of rules looks like a spreadsheet, making it easy for business users to understand and describe their business rules. Decision Tables can be used standalone, although they are usually referenced and used within process or case models.
DMN (Decision Model and Notation) is a published standard to describe decisions and business rules. The DMN standard is complementary to the BPMN and CMMN standards and extends them by integrating specific DMN decision tasks into the process and case model.
With DMN you are able to:
-
Document and comply with business rules for regulatory compliance and security audits.
-
Automate manual decision making.
-
Improve and simplify BPMN processes where decisions were modeled using BPMN expressions.
You can find more detailed information in the DMN standard.
User Interface
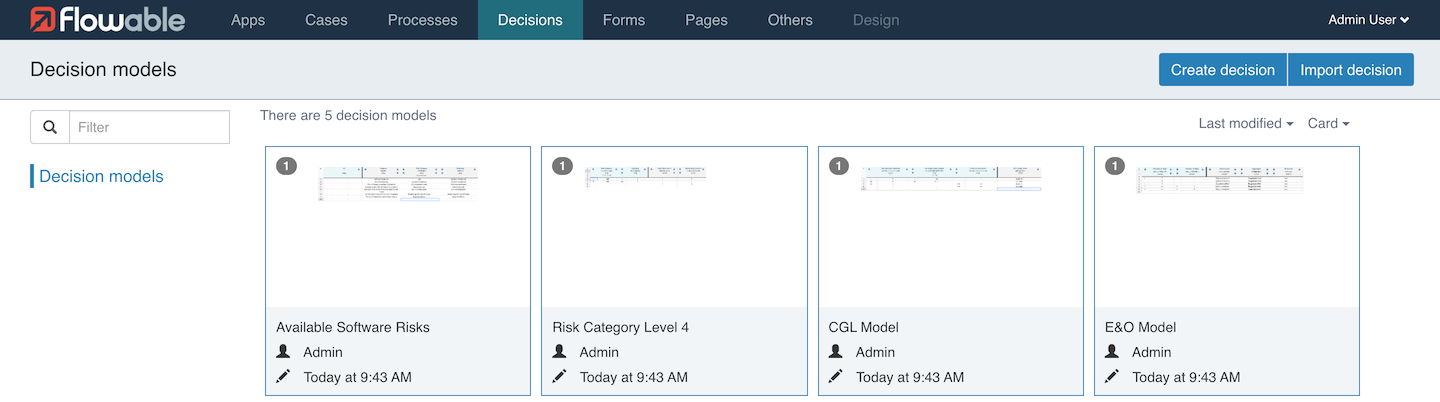
The model list enables the following actions:
-
View and change model details, see Decision Details
-
Edit a model, see Decision Editor
The following sections describe each feature in more detail.
Creating a New Decision Table
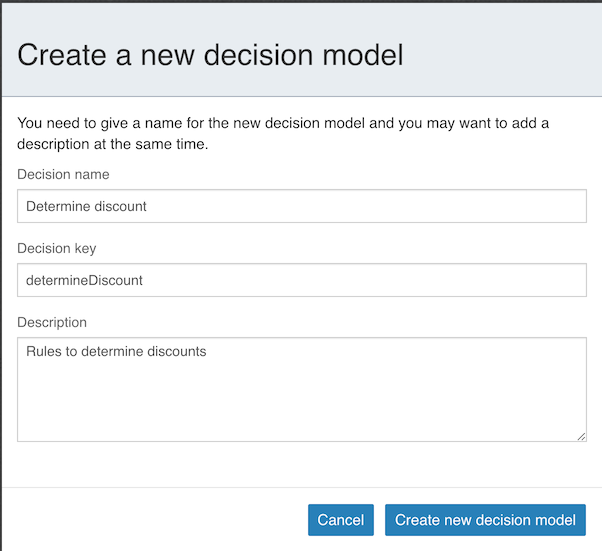
Click the button labeled Create decision, a dialog prompts you to enter
basic information:
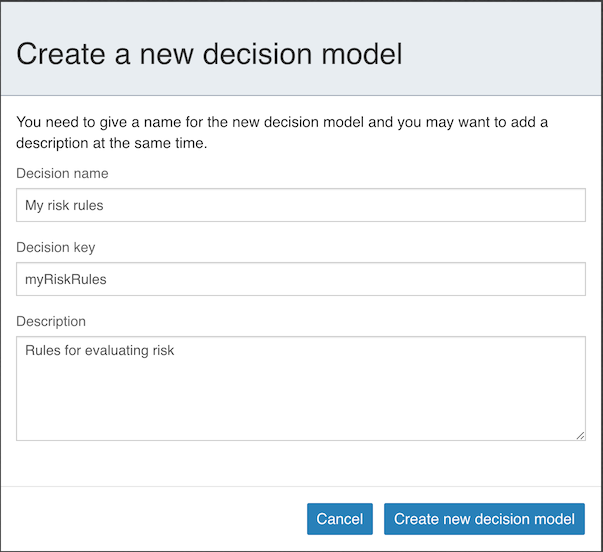
-
The display name of the action.
-
The action’s unique key.
-
An optional description of the action.
By clicking Create new decision model, a new decision model is created and you are
redirected to the edit view of the decision table where you can start to add rules.
See Decision Editor for more information.
Decision Details
Here, you see the name, description, version, creator and the modification date of the model as well as the current values of the properties that are used to define the model.

If you want to see an older version of your model, press on the History
button and choose the version you are interested in viewing.
On the top-right, there are these icons:
| Edits the name, description, and key of the model. |
| Duplicates the model. |
| Deletes the model. |
| Downloads the model as a file. |
| Opens the editor of the model which allows you to modify the content of the model. |
Decision Editor
The Decision Editor interface is roughly divided into three areas:
-
The menu bar on top, just below the navigation bar
-
The inputs on the left side
-
The outputs on the right side
The following sections describe each area in detail.
Menu Bar
The menu bar offers a number of actions, some of them only affecting the currently opened model while others have a more global impact.

| Group | Icon | Description |
|---|---|---|
| Save |  | Saves the currently opened model. |
 | Saves all opened models. | |
| Validate |  | Validates the currently opened model. |
| Export |  | Exports the currently opened model, only possible if the model was saved. |
| Publish |  | Publish an app, see publishing apps. |
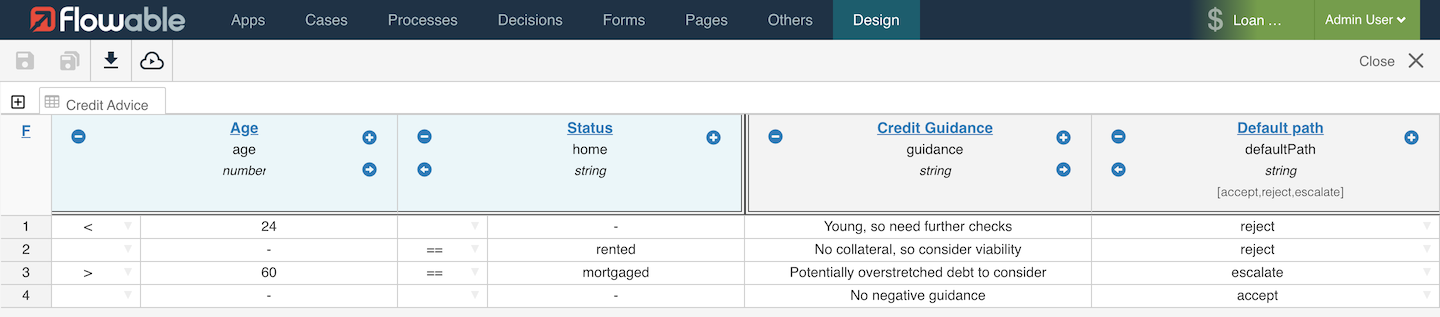
Rules Area
Each row in the Decision Table can be considered as a single rule. Each column on the left side is an input condition, each column on the right is an output value. On the far left it is possible to select the Hit Policy for the rules. This determines how the rules are executed and when to stop evaluating rules. An example of creating a Decision Table is given in the following section.
Creating Rules
The example presented is a very simple use case: determining the discount percentage
based on a customer category. To start, click the Create decision button.
Provide a decision table name and a unique decision table key and select the
Create new decision model button.

You are now ready to define your decision table. Let us describe what is presented within the editor.
Hit Policy��
In the top left corner, you can select a hit policy.
There are seven hit policies available:
single hit
-
FIRST: multiple (overlapping) rules can match, with different output entries. The first hit by rule order is returned and evaluation halts.
-
UNIQUE: no overlap is possible and all rules are disjoint. Only a single rule can be matched.
-
ANY: there may be overlap, but all of the matching rules show equal output entries for each output so that any match is used. If the output entries are non-equal, the hit policy is incorrect and the result is empty and marked as failed. When strict mode is disabled the last valid rule is the result. (The violation is presented as a validation message.)
-
PRIORITY: multiple rules can match, with different output entries. This policy returns the matching rule with the highest output priority. Output priorities are specified in the ordered list of output values, in decreasing order of priority. When strict mode is disabled and there are no output values defined the first valid rule be the result. (The violation is presented as a validation message.)
multiple hits
-
RULE ORDER: returns all hits in rule order.
-
OUTPUT ORDER: returns all hits in decreasing output priority order. Output priorities are specified in the ordered list of output values in decreasing order of priority.
-
COLLECT: returns all hits in arbitrary order. An operator ('+', '<', '>', '#') can be added to apply a simple function to the outputs. If no operator is present, the result is the list of all the output entries.
-
+ (sum): the result of the decision table is the sum of all the distinct outputs.
-
< (min): the result of the decision table is the smallest value of all the outputs.
-
> (max): the result of the decision table is the largest value of all the outputs.
-
# (count): the result of the decision table is the number of distinct outputs.
-
Input and Output Expressions
The header of the decision table itself is divided into two sections; blue (on the left) and green (on the right). In the blue section are the input expressions; the green section are the output expressions.
Click on New Input and the following dialog is presented:
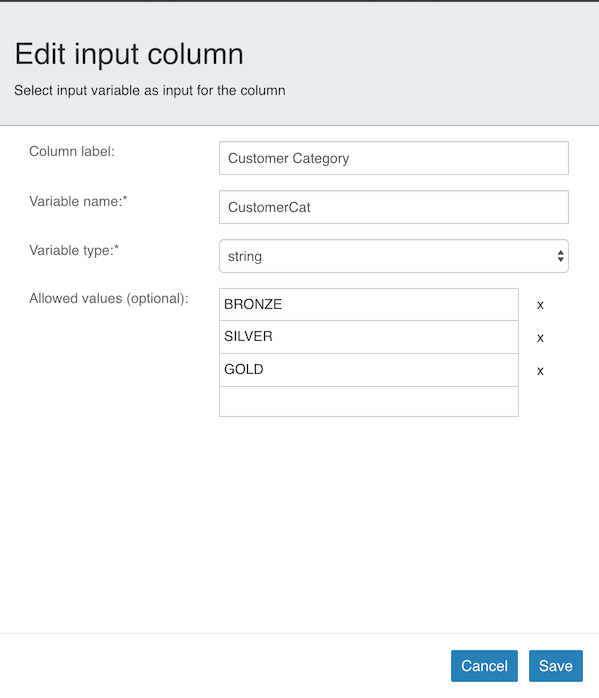
Within an input expression, you can define the variable that is used in the
expression of the rule input entries (explained below). It is possible to define
multiple input expressions by selecting Add input (right click the option menu
or by clicking the plus icon).
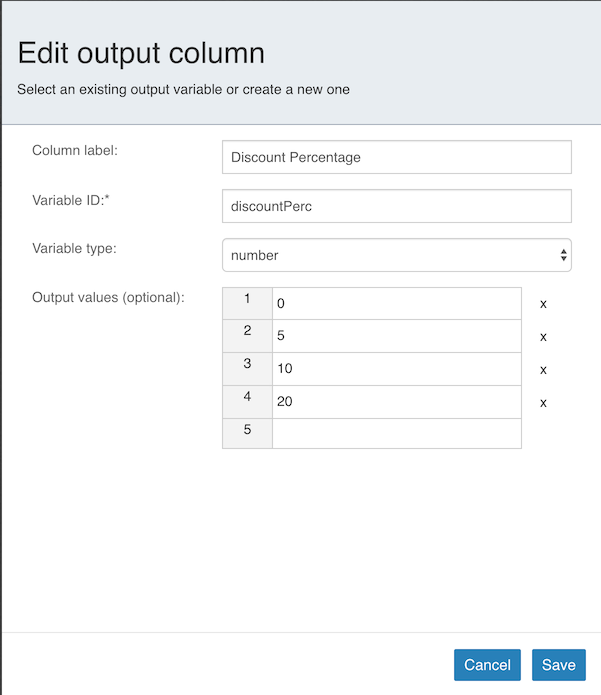
Within an output expression, you can define what variable is created to form the
result of a decision table execution (the output entry expression determines
the value of the variable; explained below). It is possible to define multiple output
expressions by selecting Add output (right click the option menu or by clicking
the plus icon).
Rules
Each rule consists of one or more input entries and one or more output entries. An input entry is an expression that is evaluated against the input variable (of that 'column'). When all input entries are evaluated to be true, the rule is considered true, and the output entry is evaluated.
 note
noteThe DMN specification defines an expression language: (S)-FEEL. Currently, we do not support this optional part of the specification. Within Flowable DMN, we use Java Unified Expression Language (JUEL) as the expression language.

To enter an expression, first select the condition that is applied to the input
variable from the drop down box in the first column. Next double-click on the
corresponding cell and enter BRONZE. Combined with the variable defined in
the corresponding input expression (column header), this results at runtime
in the full expression customerCat == "BRONZE".

To enter an output expression, double-click the corresponding cell.
In this example, the expression 5 entered. This is actually more like an
implicit assignment. The value 5 is assigned to the variable in the
corresponding output entry (column) when all input entries of that rule
are evaluated true.
We can then continue completing the decision table by adding more rules
(by selecting Add rule below).
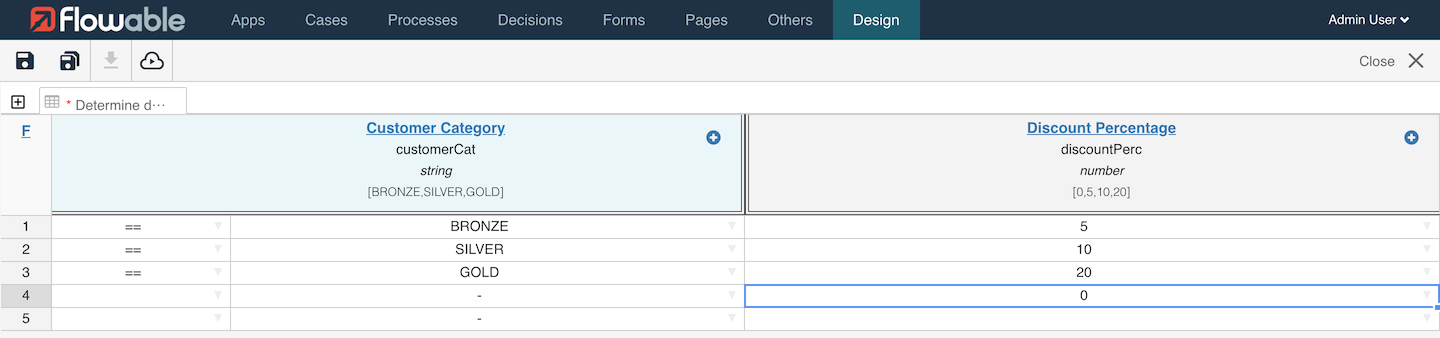
In our example, rule 4 has an empty input entry. The engine evaluates empty input entries as true. This means that if none of the other rules are valid, the outcome of rule 4 is the output of this decision table. In this case, variable discountPerc has the value 0.
The decision table can now be saved and linked to other process and case models as needed.