Chat Only Installation Topics
This section consolidates all installation items that are only relevant when using the Flowable chat capabilities (Engage) and the additional adapter add-ons like WhatsApp, WeChat and LINE.
Prerequisites
WebSockets
The chat feature of Flowable uses advanced Web 2.0 technologies to allow real time communication directly within a browser.
To achieve this, all network components (routers, firewalls, proxies, browsers, etc.) need to support the WebSocket technology as specified in RFC 6455.
If your infrastructure is not WebSocket capable, a fallback is to use either the supported streaming or long polling options. These alternatives have some impact on your infrastructure requirements.
It is also possible to allow or deny the use of WebSockets on a user role level.
STOMP Messaging Queue
The chat feature of Flowable requires a messaging queue to enable real time communication between users that supports the STOMP protocol.
Any STOMP compatible messaging queue is supported but Flowable recommends ActiveMQ as the preferred messaging queue. For clustered environments you should choose a "network of brokers" over the master-slave configuration. It is best to have one ActiveMQ node per Flowable server node and let it connect to it.
Flowable Adapters
The chat feature of Flowable uses additional communication adapters to integrate with 3rd party messaging platforms (like WhatsApp, WeChat, LINE, Facebook, etc.). The communication adapters are built on Java and Spring Boot. They require Java 8, 11, or (since v3.12.0+) 17. All the adapters are stateless (without a database) and communicate via JMS with Flowable.
WhatsApp Adapter
Memory and disk space requirements depend on the specific use cases modelled, the number of users and the expected number and size of the documents.
| CPU | RAM | Disk | |
|---|---|---|---|
| Minimum | 1 | 2 GB | 10 GB |
| Recommended | 2 | 4 GB | 20 GB |
Apart from the Flowable WhatsApp Adapter, the WhatsApp client provided by Facebook should be installed as well. Information on how to install the WhatsApp client provided by Facebook can be found here. You can find more information in Third-Party Messenger Integration.
WeChat Adapter
Memory and disk space requirements depend on the specific use cases modelled, the number of users and the expected number and size of the documents.
| CPU | RAM | Disk | |
|---|---|---|---|
| Minimum | 1 | 2 GB | 10 GB |
| Recommended | 2 | 4 GB | 20 GB |
You can find more information in Third-Party Messenger Integration.
LINE Adapter
Memory and disk space requirements depend on the specific use cases modelled, the number of users and the expected number and size of the documents.
| CPU | RAM | Disk | |
|---|---|---|---|
| Minimum | 1 | 2 GB | 10 GB |
| Recommended | 2 | 4 GB | 20 GB |
You can find more information in Third-Party Messenger Integration.
Using JMS
Chat capabilities Only
The Flowable application uses JMS to communicate with the adapters that are responsible for communicating with the third party external systems (e.g., WhatsApp, WeChat, LINE, etc.).
 note
noteFlowable listens to the defined queues only if the appropriate external system dependency is present.
Queues
These are the queues that the Flowable Application is subscribed to:
Flowable Queues
| Third Party System | Property | Default Value |
|---|---|---|
flowable.external-system.whatsapp.inbound-payload | whatsapp-inbound-payload | |
flowable.external-system.whatsapp.inbound | whatsapp-inbound | |
flowable.external-system.whatsapp.inbound-status | whatsapp-inbound-status | |
flowable.external-system.whatsapp.inbound-error | whatsapp-inbound-error | |
flowable.external-system.wechat.inbound | wechat-inbound | |
flowable.external-system.wechat.inbound-status | wechat-inbound-status | |
flowable.external-system.wechat.inbound-error | wechat-inbound-error | |
flowable.external-system.wechat.get-access-token | wechat-get-access-token | |
flowable.external-system.wechat.store-access-token | wechat-store-access-token | |
| LINE | flowable.external-system.line.inbound-payload | line-inbound-payload |
| LINE | flowable.external-system.line.inbound | line-inbound |
| LINE | flowable.external-system.line.inbound-status | line-inbound-status |
| LINE | flowable.external-system.line.inbound-error | line-inbound-error |
Flowable WhatsApp Adapter Queues
| Property | Default Value |
|---|---|
flowable.adapter.whatsapp.jms.outbound | whatsapp-outbound |
Flowable WeChat Adapter Queues
| Property | Default Value |
|---|---|
flowable.adapter.wechat.jms.outbound | wechat-outbound |
Flowable LINE Adapter Queues
| Property | Default Value |
|---|---|
flowable.adapter.line.jms.outbound | line-outbound |
These are the JMS queues (and properties) that the Flowable applications are sending to:
Flowable destination queues
| Third Party system | Property | Default Value |
|---|---|---|
flowable.external-system.whatsapp.outbound | whatsapp-outbound | |
flowable.external-system.wechat.outbound | wechat-inbound | |
| LINE | flowable.external-system.line.outbound | line-inbound |
Flowable WhatsApp Adapter destination queues
| Property | Default Value |
|---|---|
flowable.adapter.whatsapp.jms.inbound-payload-destination | whatsapp-inbound-payload |
flowable.adapter.whatsapp.jms.inbound-message-destination | whatsapp-inbound |
flowable.adapter.whatsapp.jms.inbound-status-destination | whatsapp-inbound-status |
flowable.adapter.whatsapp.jms.inbound-error-destination | whatsapp-inbound-error |
Flowable WeChat Adapter destination queues
| Property | Default Value |
|---|---|
flowable.adapter.wechat.jms.inbound-message-destination | wechat-inbound |
flowable.adapter.wechat.jms.inbound-status-destination | wechat-inbound-status |
flowable.adapter.wechat.jms.inbound-error-destination | wechat-inbound-error |
flowable.adapter.wechat.jms.inbound-get-access-token-destination | wechat-get-access-token |
flowable.adapter.wechat.jms.inbound-store-access-token-destination | wechat-store-access-token |
Flowable LINE Adapter destination queues
| Property | Default Value |
|---|---|
flowable.adapter.line.jms.inbound-payload-destination | line-inbound-payload |
flowable.adapter.line.jms.inbound-message-destination | line-inbound |
flowable.adapter.line.jms.inbound-status-destination | line-inbound-status |
flowable.adapter.line.jms.inbound-error-destination | line-inbound-error |
ActiveMQ
Chat capabilities Only
Flowable provides out of the box support (via Spring Boot) for using the ActiveMQ client. In order to use ActiveMQ add the following dependency:
<dependency>
    <groupId>org.springframework.boot</groupId>
    <artifactId>spring-boot-starter-activemq</artifactId>
</dependency>
This dependency pulls in the needed transitive dependencies for communicating with ActiveMQ.
Configuration Options
Configuring the connection with ActiveMQ is done by defining your properties in
an application.properties file, environment properties, system properties, etc.
For more information see Using Spring Boot Properties.
ActiveMQ Connection Factory Options
| Property | Description | Default Value |
|---|---|---|
| URL of the ActiveMQ broker. Auto-generated by default. | - |
| Whether the default broker URL should be in memory. Ignored if an explicit broker has been specified. |
|
| Login user of the broker. | - |
| Login password of the broker. | - |
| Time to wait before considering a close complete. | 15 seconds |
| Whether to stop message delivery before re-delivering messages from a rolled back transaction. This implies that message order is not preserved when this is enabled. |
|
| Time to wait on message sends for a response. Set it to 0 to wait forever. | 0 |
| Whether to trust all packages. | - |
| Comma-separated list of specific packages to trust (when not trusting all packages). | - |
Pooled Connection Factory Options
There is an option to enable using the JmsPoolConnectionFactory.
This is disabled by default.
It can be configured by using the following properties:
| Property | Description | Default Value |
|---|---|---|
| Use |
|
| Block a connection when the pool is full. |
|
| Blocking period before throwing an exception if the pool is still full. | -1 |
| Connection idle timeout. | 30 seconds |
| Maximum number of pooled connections. | 1 |
| Maximum number of pooled sessions per connection in the pool. | 500 |
| Time to sleep between runs of the idle connection eviction thread. When negative, no idle connection eviction thread runs. | -1 |
| Whether to use only one anonymous "MessageProducer" instance. Set it to |
|
Cached Connection Factory Options
By default the Spring CachingConnectionFactory is used with the following properties:
| Property | Description | Default Value |
|---|---|---|
| Whether to cache sessions. |
|
| Whether to cache message consumers. |
|
| Whether to cache message producers. |
|
| Size of the session cache (per JMS Session type). | -1 |
Flowable with Chat Capabilities Dependencies
Flowable with chat capabilities utilizes multiple Maven dependencies to access the required Flowable services.
Add the following dependencies as children of the existing <dependencies> tag
of the pom.xml file to set up Flowable with chat capabilities:
<!-- Flowable -->
<!-- =============== -->
<dependency>
    <groupId>com.flowable.engage</groupId>
    <artifactId>flowable-spring-boot-starter-engage-rest</artifactId>
</dependency>
<dependency>
    <groupId>com.flowable.platform</groupId>
    <artifactId>flowable-tenant-setup</artifactId>
</dependency>
<dependency>
    <groupId>com.flowable.platform</groupId>
    <artifactId>flowable-platform-default-models</artifactId>
</dependency>
<dependency>
    <groupId>com.flowable.engage</groupId>
    <artifactId>flowable-engage-default-models</artifactId>
</dependency>

<!-- Spring Boot -->
<!-- =========== -->
<dependency>
    <groupId>org.springframework.boot</groupId>
    <artifactId>spring-boot-starter-activemq</artifactId>
</dependency>
Flowable with Chat Capabilities User Definitions
Flowable with chat capabilities manages features and permissions of an application user by defining user definitions.
User definitions follow a "template" pattern for each different types of user using the system. Example include: administrators, superusers, operators, client advisers, clients, etc. They all have different feature sets available, different member groups, different permissions, etc.
To define the user definitions for your Flowable with chat capabilities setup create a file like:
src/main/resources/com/flowable/users/custom/<users>-definitions.user.json
where <users> is a meaningful name for the set of user definitions.
Use the following content to define an admin user with full permissions to the Flowable with chat capabilities:
[
  {
    "key": "admin",
    "name": "Flowable Administration User",
    "description": "Creates a new, administration user.",
    "allowedFeatures": [
      "contacts",
      "createUser",
      "reports",
      "reportsMetrics",
      "actuators",
      "user-mgmt",
      "search-api",
      "templateManagement",
      "conversations",
      "websockets",
      "createConversation",
      "sendMessageFromProfile",
      "emojiPicker",
      "markdownInput",
      "editMessage",
      "deleteMessage",
      "fileUpload",
      "audioMessage",
      "videoMessage",
      "slashActions",
      "work",
      "tasks",
      "editAvatar"
    ]
  }
]
Flowable with Chat Capabilities Configuration
Flowable with chat capabilities uses Spring Messaging for real time communication and needs an additional annotation to initialize the messaging components.
For this, you need to add the @EnableWebSocketMessageBroker annotation to your Spring Boot application class so it looks like this:
@SpringBootApplication
@EnableWebSocketMessageBroker
public class <MainClass>Application {
    public static void main(String[] args) {
        SpringApplication.run(<mainclass>Application.class, args);
    }
}
where <mainclass> is the name of the main class specific to your application.
ActiveMQ Installation
Chat capabilities Only
A JMS and STOMP protocol compatible messaging queue (MQ) is only needed for the real-time communication provided by Flowable with the chat capabilities feature.
You can use your own MQ. The following instructions describe the installation of the recommended ActiveMQ instance:
-
Download the latest ActiveMQ version from http://activemq.apache.org/download.html.
-
Extract the package to a desired folder on the filesystem.
-
Update configuration for STOMP as explained here
-
From a command prompt in that folder start ActiveMQ by entering
bin/activemq start.
Flowable expects ActiveMQ to listen on port 61616 for JMS and on port 61613 for STOMP. These values are the default configuration for each vendor.
If you are running ActiveMQ on a different host or port, you can configure the addresses of ActiveMQ in the application.properties file you created
previously by setting these parameters:
flowable.websocket.stomp-broker-addresses=localhost:61613
spring.activemq.broker-url=tcp://localhost:61616
Additional information about ActiveMQ configuration is found here.
ActiveMQ (STOMP) (optional)
Due to the way ActiveMQ implements the STOMP protocol the amount of queues and topics keeps growing.
For every user session (a user logs into Flowable) there will be a topic created with the format messages-user<sessionId>.
If a user has two tabs open there will be two topics, etc. When a user logs out and then logs in, a new topic will be created.
For every user that has logged in at least ones there will be a queue created with the format /user/<userId>/topic/messages.
ActiveMQ provides a way to remove inactive topics and queues by configuring a policy map. However, when using the default persistence (KahaDB) the policy map has no influence, because the KahaDB adapter doesn't do anything when the broker removes the inactive messages / queues. Therefore, the KahaDB file keeps growing.
Our recommendation is to use one non-persistent broker for STOMP and persistent brokers for other use cases (e.g. the whatsapp or wechat adapter).
In order to do this, the conf/activemq.xml file needs to be adapted.
As a first step the transport connector for STOMP needs to be commented out.
As a second step the second broker needs to be configured using the following snippet:
<broker xmlns="http://activemq.apache.org/schema/core" brokerName="localhost-stomp" schedulePeriodForDestinationPurge="10000" persistent="false">
<destinationPolicy>
<policyMap>
<policyEntries>
<policyEntry topic=">" gcInactiveDestinations="true" inactiveTimoutBeforeGC="60000"/>
<policyEntry queue=">" gcInactiveDestinations="true" inactiveTimoutBeforeGC="60000"/>
</policyEntries>
</policyMap>
</destinationPolicy>
<!--
The managementContext is used to configure how ActiveMQ is exposed in
JMX. By default, ActiveMQ uses the MBean server that is started by
the JVM. For more information, see:
http://activemq.apache.org/jmx.html
-->
<managementContext>
<managementContext createConnector="false"/>
</managementContext>
<!--
The transport connectors expose ActiveMQ over a given protocol to
clients and other brokers. For more information, see:
http://activemq.apache.org/configuring-transports.html
-->
<transportConnectors>
<!-- DOS protection, limit concurrent connections to 1000 and frame size to 100MB -->
<transportConnector name="stomp" uri="stomp://0.0.0.0:61613?maximumConnections=1000&transport.hbGracePeriodMultiplier=1&wireFormat.maxFrameSize=104857600"/>
</transportConnectors>
<!-- destroy the spring context on shutdown to stop jetty -->
<shutdownHooks>
<bean xmlns="http://www.springframework.org/schema/beans" class="org.apache.activemq.hooks.SpringContextHook"/>
</shutdownHooks>
</broker>
This snippet configures a non-persistent (in memory) broker. Losing some STOMP messages is completely fine for Flowable, since we are only using this for sending notifications to the user browsers.
The schedulePeriodForDestinationPurge is the interval (in milliseconds, 10 seconds in the snippet) that ActiveMQ should use to check for inactive topics / queues.
The policy entries are configured to remove all topics and queues (by using > for topic and queue respectively) that have been inactive for 60 seconds (using inactiveTimoutBeforeGC).
The transportConnectors has the default transport connector from the default broker configuration.
The parts for the managementContext and shutdownHooks are the same as for the default broker.
You can tweak them as you need.
ActiveMQ Clustering
The recommended setup for clustered ActiveMQ nodes is a Network of Brokers.
For this, an additional networkConnector needs to be added to the activemq.xml configuration file
lying in the conf directory of ActiveMQ:
<broker brokerName="receiver" persistent="false" useJmx="false">
    <networkConnectors>
      <networkConnector uri="static:(tcp://node2:61616,tcp://node3:61616)"/> <!-- addresses of all other nodes -->
    </networkConnectors>
    ...
</broker>
In addition, modify the Flowable Server properties to add the ActiveMQ nodes for failover purposes:
flowable.websocket.stomp-broker-addresses=node1:61612,node2:61613,node3:61613
spring.activemq.broker-url=failover:(tcp://node1:61616,tcp://node2:61616,tcp://node3:61616)
WhatsApp Adapter Configuration
The Flowable WhatsApp Adapter is able to run in a single account or multiple business accounts setup.
The WhatsApp on Premise support will expire on October 23, 2025. The adapter can be configured to run either with the WhatsApp Cloud API (v3.13.13+v3.14.7+v3.15.3+) or the On-Premise API
Single WhatsApp Business Account Configuration
Cloud API
v3.13.13+ v3.14.7+ v3.15.3+The WhatsApp Adapter needs to be configured via properties to connect to the WhatsApp Cloud API.
flowable.adapter.whatsapp.default-account-mode=cloud
flowable.adapter.whatsapp.default-api-endpoint=https://graph.facebook.com/v18.0/
flowable.adapter.whatsapp.default-api-webhook-verification-token=webhookVerificationToken
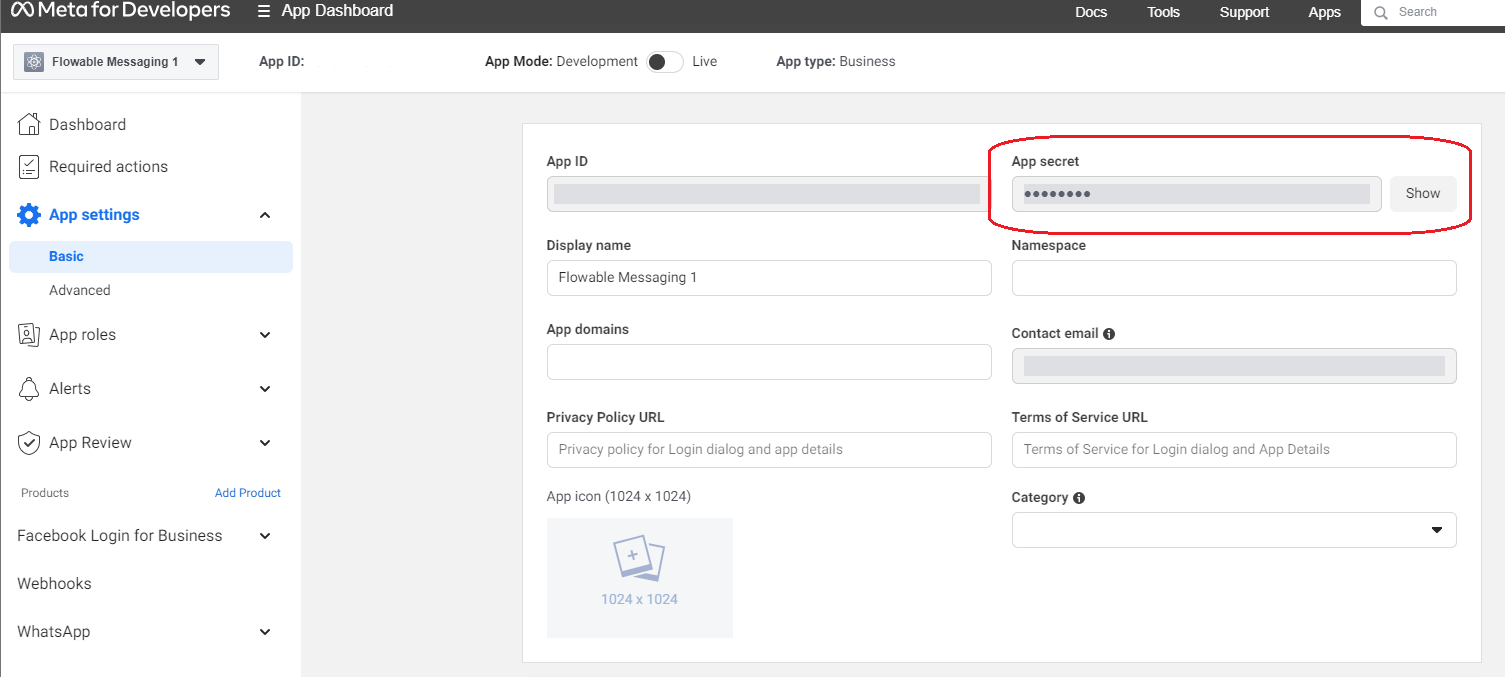
flowable.adapter.whatsapp.default-api-secret=appSecret
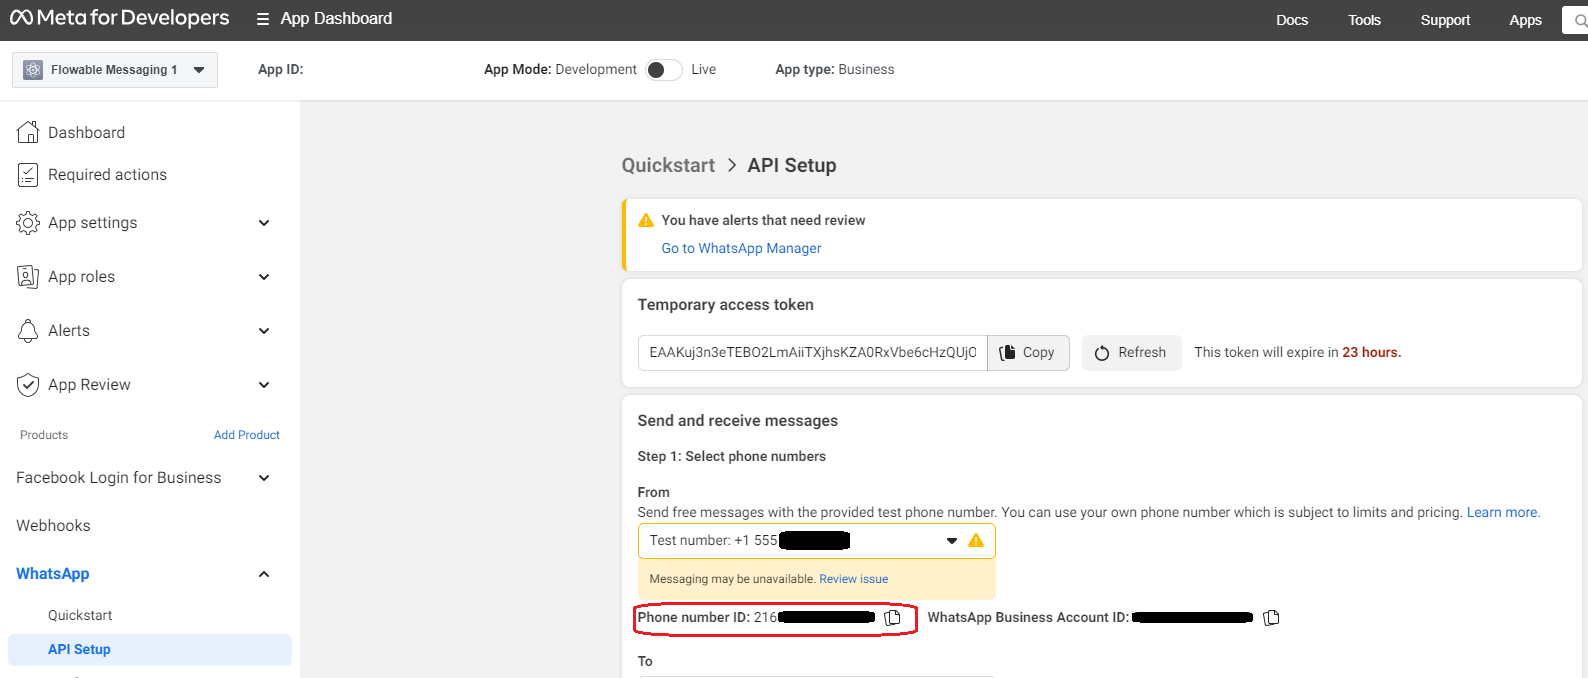
flowable.adapter.whatsapp.default-business-account-phone-number-id=BusinessPhoneNumberID
flowable.adapter.whatsapp.default-api-access-token=accessToken
And on the other side, the WhatsApp Developer Console, the webhook needs to be configured to send inbound messages to the WhatsApp Adapter with the following https endpoint: Visit that link
Webhook URLs = https://<<WhatsApp-Adapter-URL>>/whatsapp-api/cloud/webhook
Api Secret
You can find the secret in the WhatsApp Developer Console.
noteSince v3.13.13+v3.14.7+v3.15.4+ the api secret supports a list of string values. This feature facilitates seamless migration following the refresh of your WhatsApp app secret. New WhatsApp app secrets become valid after a specified period. To avoid longer downtime during the refresh, you can create a new WhatsApp app secret, configure the WhatsAppAdapter with the additional api secret and restart the adapter. After the time period, WhatsApp will stop sending signatures based on the old secret and will use the new secret.
Api Secret Expiry Date
Since v3.13.16+v3.14.9+v3.15.8+ you can provide a list of expiry dates for each secret.
While resetting an app secret, WhatsApp allows you to set a grace period before the old secret is obsolete. To mirror that behavior in the WhatsApp adapter,
we introduced the properties flowable.adapter.whatsapp.default-api-secret-expiry-dates and flowable.adapter.whatsapp.accounts.{accountName}.api-secret-expiry-dates.
Api secrets and expiry dates are mapped by index. If you provide more secrets than dates, those secrets will have no expiry date.
flowable.adapter.whatsapp.default-api-secret=oldSecret,newSecret
flowable.adapter.whatsapp.default-api-secret-expiry-dates=2024-07-02T12:15:00+02:00
In this configuration:
oldSecretwill expire on2024-07-02T12:15:00+02:00.newSecretwill not have any expiry date
noteIf only one secret and one expiry date is provided, the date will not be taken into account.
Webhook Verification Token
You can pick whatever you want for your webhook verification token

API Access Token
Check out the WhatsApp documentation to create a permanent access token
Phone Number ID
On-Premise
The WhatsApp Adapter needs to be configured via properties to connect to the WhatsApp client On-Premise API.
flowable.adapter.whatsapp.default-account-mode=on-premise
flowable.adapter.whatsapp.default-api-endpoint=https://whatsapp-clientXY.flowable.io/
flowable.adapter.whatsapp.default-username=admin
flowable.adapter.whatsapp.default-password=secret_password
flowable.adapter.whatsapp.default-namespace=default_namespace
And on the other side, the WhatsApp Client needs to be configured to send inbound messages to the WhatsApp Adapter with the following http/https endpoint:
Webhook URLs = https://<<WhatsApp-Adapter-URL>>/whatsapp-api/webhook
For the single WhatsApp Business Account setup it is also important that the businessId is not set when creating a UserAccount in Flowable.
UserAccount userAccount = userAccountService.createNewUserAccountBuilder()
    .name(name)
    .userId(userId)
    .externalUserId(externalUserId)
    .businessAccountId(null)
    .userAccountDefinitionKey(userAccountDefinitionKey)
    .subType(subType)
    .save();
Multiple WhatsApp Business Account Configuration
Also in the multiple WhatsApp Business Account setup the WhatsApp Adapter needs to be configured via properties.
For the configuration example, let's assume there are two WhatsApp Business Accounts your application needs to connect to, and let's call them flowable (cloud api) and mimacom (on premise api).
flowable.adapter.whatsapp.accounts.flowable.account-mode=cloud
flowable.adapter.whatsapp.accounts.flowable.api-endpoint=https://graph.facebook.com/v18.0/
flowable.adapter.whatsapp.accounts.flowable.api-webhook-verification-token=webhookVerificationToken
flowable.adapter.whatsapp.accounts.flowable.api-secret=appSecret
flowable.adapter.whatsapp.accounts.flowable.business-account-phone-number-id=BusinessPhoneNumberID
flowable.adapter.whatsapp.accounts.flowable.api-access-token=accessToken

flowable.adapter.whatsapp.accounts.mimacom.account-mode=on-premise
flowable.adapter.whatsapp.accounts.mimacom.api-endpoint=http://whatsapp-client.mimacom.io
flowable.adapter.whatsapp.accounts.mimacom.username=admin
flowable.adapter.whatsapp.accounts.mimacom.password=secret_mimacom_password
flowable.adapter.whatsapp.accounts.mimacom.namespace=mimacom_namespace
Cloud API
Now, on the WhatsApp Developer Console, the Webhook configuration needs to be configured based on the following pattern:
Webhook URLs = https://<<WhatsApp-Adapter-URL>>/whatsapp-api/cloud/webhook/account/<<account-id>>
On-Premise
Now, on the WhatsApp Client configuration, the Webhook configuration needs to be configured based on the following pattern:
Webhook URLs = https://<<WhatsApp-Adapter-URL>>/whatsapp-api/webhook/account/<<account-id>>
The <<account-id>> in our example would be flowable and mimacom and thus, the Webhook URL would be like following:
- For the flowable WhatsApp Client:
https://<<WhatsApp-Adapter-URL>>/whatsapp-api/cloud/webhook/account/flowable - For the mimacom WhatsApp Client:
https://<<WhatsApp-Adapter-URL>>/whatsapp-api/webhook/account/mimacom
For the multiple WhatsApp Business Account setup it is important that the businessAccountId of the UserAccount reflects the WhatsApp Business Account the UserAccount is interacting with.
UserAccount userAccount = userAccountService.createNewUserAccountBuilder()
    .name(name)
    .userId(userId)
    .externalUserId(externalUserId)
    .businessAccountId(accountId)
    .userAccountDefinitionKey(userAccountDefinitionKey)
    .subType(subType)
    .save();
Also here, the accountId variable needs to reflect the Whatsapp Account ID and thus, in our example flowable or mimacom.
If the businessAccountId is empty, then the UserAccount interacts with the default-api-endpoint as described in the Single WhatsApp Business Account configuration above.
WhatsApp Adapter Content Handling Configuration
To work with media messages, i.e. attachments send through WhatsApp, the following properties need to be configured in the WhatsApp Adapter:
flowable.adapter.content.enabled=true
flowable.adapter.content.rest-endpoint=http://<hostname of Flowable>/<application root>/content-api/
flowable.adapter.content.admin-username=<admin username>
flowable.adapter.content.admin-password=<admin password>
flowable.adapter.whatsapp.content-authorization=Basic Zmxvd2FibGU6bWltYWNvbQ==
flowable.adapter.whatsapp.receive-content-max-size=-1
The property flowable.adapter.content.enabled enables the servlet for content handling.
The credentials provided in flowable.adapter.content.admin-username and flowable.adapter.content.admin-password are used to access the
content endpoint in Flowable defined in flowable.adapter.content.rest-endpoint.
This applies to the default security configuration with Basic Authentication in Flowable. If you have a custom authentication like Kerberos or OAuth2, you need to customize the WebClient in the WhatsApp Adapter to use the same authentication.
The property flowable.adapter.whatsapp.content-authorization secures the content REST endpoint in the WhatsApp
adapter by the chosen authorization (in the above example it's a base64 encoded basic authentication with username
flowable and password mimacom).
This must be in sync with the credentials configured in flowable.external-system.whatsapp.content.rest-username and flowable.external-system.whatsapp.content.rest-password
in Flowable (see below).
The flowable.adapter.whatsapp.receive-content-max-size can be used to limit the content data size when receiving
WhatsApp content (by default it is set to -1, which means unlimited).
After this has been set, then the REST endpoint will be available with the configured authorization:
GET https://<<WhatsApp-Adapter-URL>>/whatsapp-api/content/<<content-id>>".
Additionally, the Flowable application requires the following properties to be set in order to fetch the message attachments from the WhatsApp adapter.
The credentials must match the ones used to create the base64 token in flowable.adapter.whatsapp.content-authorization:
flowable.external-system.whatsapp.content.base-content-url=http://<hostname of WhatsApp Adapter>:<port>/whatsapp-api/content/
flowable.external-system.whatsapp.content.rest-username=<admin username>
flowable.external-system.whatsapp.content.rest-password=<admin password>
These configurations enable content, i.e. all other supported message types in addition to text, to be retrieved from WhatsApp. See WhatsApp Message Type Configuration to configure the supported WhatsApp message types.
WhatsApp Adapter Additional Configuration
The WhatsApp Adapter is a Spring Boot application and can be configured by the following properties.
server.port=31331
flowable.adapter.whatsapp.webhook-servlet-path=/whatsapp-api
flowable.adapter.whatsapp.webhook-load-on-startup=-1

spring.activemq.broker-url=tcp://localhost:61616
It runs by default on port 31331 and creates a webhook servlet on the path whatsapp_api. The Servlet is lazy-loaded by default, but if no lazy loading is desired, this can be configured by flowable.adapter.whatsapp.webhook-load-on-startup=1.
The WhatsApp Adapter uses an ActiveMQ broker for the following inbound and outbound queues (which can be reconfigured to your own requirements).
flowable.adapter.whatsapp.jms.inbound-payload-destination=whatsapp-inbound-payload
flowable.adapter.whatsapp.jms.inbound-message-destination=whatsapp-inbound
flowable.adapter.whatsapp.jms.inbound-status-destination=whatsapp-inbound-status
flowable.adapter.whatsapp.jms.inbound-error-destination=whatsapp-inbound-error
flowable.adapter.whatsapp.jms.outbound=whatsapp-outbound

flowable.adapter.whatsapp.jms.send-message-wait-duration=PT10S
If the default queue names are changed in the WhatsApp Adapter, it is necessary to also change the Flowable configuration to match the queue names. This can be achieved by the Flowable properties described here.
WhatsApp BSUID Support
v3.17.16+ 2025.1.11+ 2025.2.05+ 2026.1+The WhatsApp Adapter supports BSUID (Business-scoped User ID) as a user identifier.
BSUIDs are an alternative to phone numbers assigned by WhatsApp and have the format CC.alphanumeric (e.g., BR.1A2B3C4D5E6F7G8H).
No additional adapter configuration is required to enable BSUID support. The adapter automatically handles both phone number and BSUID-based identification for inbound and outbound messages.
For details on how BSUIDs are resolved in messages and how to configure user accounts with BSUIDs, see the WhatsApp BSUID Developer Guide.
WeChat Adapter Configuration
The Flowable WeChat Adapter is able to run in a single account or multiple business accounts setup.
Single WeChat Business Account Configuration
The WeChat Adapter needs to be configured via properties to connect to the WeChat Business Account.
flowable.adapter.wechat.default-app-id=<<<WeChat-App-ID>>>
flowable.adapter.wechat.default-app-secret=<<<WeChat-App-Secret>>>
flowable.adapter.wechat.default-app-token=<<<WeChat-App-Token>>>
flowable.adapter.wechat.default-aes-key=<<<WeChat-Aes-Key>>>
And on the other side, the WeChat Business Account needs to be configured to send inbound messages to the WeChat Adapter using the following http/https endpoint:
Webhook URLs = https://<<WeChat-Adapter-URL>>/wechat-api/webhook
For the single WeChat Business Account setup it is also important that the businessId is not set when creating a UserAccount in Flowable.
UserAccount userAccount = userAccountService.createNewUserAccountBuilder()
    .name(name)
    .userId(userId)
    .externalUserId(externalUserId)
    .businessAccountId(null)
    .userAccountDefinitionKey(userAccountDefinitionKey)
    .subType(subType)
    .save();
Multiple WeChat Business Account Configuration
In the multiple WeChat Business Account setup, the WeChat Adapter needs to be configured via properties.
For the configuration example let's assume there are two WeChat Business Accounts your application needs to connect to, and let's call them flowable and mimacom.
flowable.adapter.wechat.accounts.flowable.app-id=<<<WeChat-App-ID for flowable>>>
flowable.adapter.wechat.accounts.flowable.app-secret=<<<WeChat-App-Secret for flowable>>>
flowable.adapter.wechat.accounts.flowable.app-token=<<<WeChat-App-Token for flowable>>>
flowable.adapter.wechat.accounts.flowable.aes-key=<<<WeChat-Aes-Key for flowable>>>

flowable.adapter.wechat.accounts.mimacom.app-id=<<<WeChat-App-ID for mimacom>>>
flowable.adapter.wechat.accounts.mimacom.app-secret=<<<WeChat-App-Secret for mimacom>>>
flowable.adapter.wechat.accounts.mimacom.app-token=<<<WeChat-App-Token for mimacom>>>
flowable.adapter.wechat.accounts.mimacom.aes-key=<<<WeChat-Aes-Key for mimacom>>>
Now, on the WeChat Business Account configuration the Webhook configuration needs to be configured based on the following pattern:
Webhook URLs = https://<<WeChat-Adapter-URL>>/wechat-api/webhook/account/<<account-id>>
The <<account-id>> in our example would be flowable and mimacom and thus, the Webhook URL would be like following:
- For the flowable WeChat Business Account:
https://<<WeChat-Adapter-URL>>/wechat-api/webhook/account/flowable - For the mimacom WeChat Business Account:
https://<<WeChat-Adapter-URL>>/wechat-api/webhook/account/mimacom
For the multiple WeChat Business Account setup it is important that the businessAccountId of the UserAccount reflects the WeChat Business Account the UserAccount is interacting with.
UserAccount userAccount = userAccountService.createNewUserAccountBuilder()
    .name(name)
    .userId(userId)
    .externalUserId(externalUserId)
    .businessAccountId(accountId)
    .userAccountDefinitionKey(userAccountDefinitionKey)
    .subType(subType)
    .save();
Also here, the accountId variable needs to reflect the WeChat Account id and thus, in our example flowable or mimacom.
If the businessAccountId is empty, then the UserAccount interacts with the default-app-* as described in the Single WeChat Business Account configuration above.
WeChat Adapter Content Handling Configuration
To work with media messages, i.e. attachments send through WeChat, the following properties need to be configured in the WeChat Adapter:
flowable.adapter.content.enabled=true
flowable.adapter.content.rest-endpoint=http://<hostname of Flowable>/<application root>/content-api/
flowable.adapter.content.admin-username=<admin username>
flowable.adapter.content.admin-password=<admin password>
flowable.adapter.wechat.content-authorization=Basic Zmxvd2FibGU6bWltYWNvbQ==
flowable.adapter.wechat.receive-content-max-size=-1
The property flowable.adapter.content.enabled enables the servlet for content handling.
The credentials provided in flowable.adapter.content.admin-username and flowable.adapter.content.admin-password are used to access the
content endpoint in Flowable defined in flowable.adapter.content.rest-endpoint.
This applies to the default security configuration with Basic Authentication in Flowable. If you have a custom authentication like Kerberos or OAuth2, you need to customize the WebClient in the WeChat Adapter to use the same authentication.
The property flowable.adapter.wechat.content-authorization secures the content REST endpoint in the WeChat
adapter by the chosen authorization (in the above example it's a base64 encoded basic authentication with username
flowable and password mimacom).
This must be in sync with the credentials configured in flowable.external-system.wechat.content.rest-username and flowable.external-system.wechat.content.rest-password
in Flowable (see below).
The flowable.adapter.wechat.receive-content-max-size can be used to limit the content data size when receiving
WeChat content (by default it is set to -1, which means unlimited).
After this has been set, then the REST endpoint will be available with the configured authorization:
GET https://<<WeChat-Adapter-URL>>/wechat-api/content/<<content-id>>".
Additionally, the Flowable application requires the following properties to be set in order to fetch the message attachments from the WeChat adapter.
The credentials must match the ones used to create the base64 token in flowable.adapter.wechat.content-authorization:
flowable.external-system.wechat.content.base-content-url=http://<hostname of WeChat Adapter>:<port>/wechat-api/content/
flowable.external-system.wechat.content.rest-username=<admin username>
flowable.external-system.wechat.content.rest-password=<admin password>
These configurations enable content, i.e. all other supported message types in addition to text, to be retrieved from WeChat. See WeChat Message Type Configuration to configure the supported WeChat message types.
WeChat Adapter Additional Configuration
The WeChat Adapter is a Spring Boot application and can be configured by the following properties.
server.port=31330
flowable.adapter.wechat.webhook-servlet-path=/wechat-api
flowable.adapter.wechat.webhook-load-on-startup=-1

spring.activemq.broker-url=tcp://localhost:61616
It runs by default on port 31330 and creates a webhook servlet on the path wechat_api. The Servlet is lazy-loaded by default, but if no lazy loading is desired, this can be configured by flowable.adapter.whatsapp.webhook-load-on-startup=1.
The WeChat Adapter uses an ActiveMQ broker for the following inbound and outbound queues (which can be reconfigured to your own requirements).
flowable.adapter.wechat.jms.inbound-message-destination=wechat-inbound
flowable.adapter.wechat.jms.inbound-status-destination=wechat-inbound-status
flowable.adapter.wechat.jms.inbound-error-destination=wechat-inbound-error
flowable.adapter.wechat.jms.outbound=wechat-outbound
flowable.adapter.wechat.jms.get-access-token-destination=wechat-get-access-token
flowable.adapter.wechat.jms.store-access-token-destination=wechat-store-access-token

flowable.adapter.wechat.jms.send-message-wait-duration=PT10S
If the default queue names are changed in the WeChat Adapter, it is necessary to also change the Flowable configuration to match the queue names. This can be achieved by the Flowable properties described here.
Furthermore, the WeChat API endpoints and more connectivity configuration can be addressed by the following properties:
flowable.adapter.wechat.api.base-url=https://api.weixin.qq.com/cgi-bin/
flowable.adapter.wechat.api.token-url=https://api.weixin.qq.com/cgi-bin/token
flowable.adapter.wechat.api.user-profile-url=https://api.weixin.qq.com/cgi-bin/user/info
flowable.adapter.wechat.api.custom-message-url=https://api.weixin.qq.com/cgi-bin/message/custom/send
flowable.adapter.wechat.api.template-message-url=https://api.weixin.qq.com/cgi-bin/message/template/send

flowable.adapter.wechat.unsupported-message-type-error=
flowable.adapter.wechat.user-profile-fetching=true
flowable.adapter.wechat.default-user-name=Unknown
flowable.adapter.wechat.secure-communication=false
# Controls whether chunked transfer encoding is disabled when communicating with the WeChat API.
# When set to true (default), the full request body is buffered before sending.
# Set to false to use chunked transfer encoding.
flowable.adapter.wechat.disable-chunked-encoding=true
LINE Adapter Configuration
The Flowable LINE Adapter is able to run in a single account or multiple business accounts setup.
Single LINE Business Account Configuration
The LINE Adapter needs to be configured via properties to connect to the LINE Messaging API Bot Channel.
flowable.adapter.line.default-channel-secret=<<<LINE-Channel-Secret>>>
flowable.adapter.line.default-channel-token=<<<LINE-Channel-Token>>>
And on the other side, the LINE Messaging API Bot Channel needs to be configured to send inbound messages to the LINE Adapter with the following https endpoint:
Webhook URL = https://<<LINE-Adapter-URL>>/line-api/webhook
For the single LINE Business Account setup it is also important that the businessId is not set when creating a UserAccount in Flowable.
UserAccount userAccount = userAccountService.createNewUserAccountBuilder()
    .name(name)
    .userId(userId)
    .externalUserId(externalUserId)
    .businessAccountId(null)
    .userAccountDefinitionKey(userAccountDefinitionKey)
    .subType(subType)
    .save();
Multiple LINE Business Account Configuration
Also in the multiple LINE Business Account setup the LINE Adapter needs to be configured via properties.
For the configuration example, let's assume there are two LINE Business Accounts your application needs to connect to, and let's call them flowable and mimacom.
flowable.adapter.line.accounts.flowable.channel-secret=<<<LINE-Flowable-Channel-Secret>>>
flowable.adapter.line.accounts.flowable.channel-token=<<<LINE-Flowable-Channel-Token>>>

flowable.adapter.line.accounts.mimacom.channel-secret=<<<LINE-Mimacom-Channel-Secret>>>
flowable.adapter.line.accounts.mimacom.channel-token=<<<LINE-Mimacom-Channel-Token>>>
Now, on the LINE Messaging API Bot Channel configuration, the Webhook configuration needs to be configured based on the following pattern:
Webhook URLs = https://<<LINE-Adapter-URL>>/line-api/webhook/account/<<account-id>>
The <<account-id>> in our example would be flowable and mimacom and thus, the Webhook URL would be like following:
- For the flowable LINE Bot Channel:
https://<<LINE-Adapter-URL>>/line-api/webhook/account/flowable - For the mimacom LINE Bot Channel:
https://<<LINE-Adapter-URL>>/line-api/webhook/account/mimacom
For the multiple LINE Business Account setup it is important that the businessAccountId of the UserAccount reflects the LINE Business Account the UserAccount is interacting with.
UserAccount userAccount = userAccountService.createNewUserAccountBuilder()
    .name(name)
    .userId(userId)
    .externalUserId(externalUserId)
    .businessAccountId(accountId)
    .userAccountDefinitionKey(userAccountDefinitionKey)
    .subType(subType)
    .save();
Also here, the accountId variable needs to reflect the LINE Account ID and thus, in our example flowable or mimacom.
If the businessAccountId is empty, then the UserAccount interacts with the default-api-endpoint as described in the Single LINE Business Account configuration above.
LINE Adapter Content Handling Configuration
To work with media messages, i.e. attachments send through LINE, the following properties need to be configured in the LINE Adapter:
flowable.adapter.content.enabled=true
flowable.adapter.content.rest-endpoint=http://<hostname of Flowable>/<application root>/content-api/
flowable.adapter.content.admin-username=<admin username>
flowable.adapter.content.admin-password=<admin password>
flowable.adapter.line.content-authorization=Basic Zmxvd2FibGU6bWltYWNvbQ==
flowable.adapter.line.receive-content-max-size=-1
flowable.adapter.line.jms.engage-rest-endpoint=http://<hostname of Flowable>/<application root>/engage-api/
The property flowable.adapter.content.enabled enables the servlet for content handling.
The credentials provided in flowable.adapter.content.admin-username and flowable.adapter.content.admin-password are used to access the
content endpoint in Flowable defined in flowable.adapter.content.rest-endpoint.
This applies to the default security configuration with Basic Authentication in Flowable. If you have a custom authentication like Kerberos or OAuth2, you need to customize the WebClient in the LINE Adapter to use the same authentication.
The property flowable.adapter.line.content-authorization secures the content REST endpoint in the LINE
adapter by the chosen Authorization (in the above example it's a base64 encoded Basic Authentication with username
flowable and password mimacom).
This must be in sync with the credentials configured in flowable.external-system.line.content.rest-username and flowable.external-system.line.content.rest-password
in Flowable (see below).
The flowable.adapter.line.receive-content-max-size can be used to limit the content data size when receiving
LINE content (by default it is set to -1, which means unlimited).
The property flowable.adapter.line.jms.engage-rest-endpoint points to the location of the Engage API where the special LineOutboundContentResource is located.
When this property is not set then sending content from Flowable to LINE is not possible.
The way outbound content (from Flowable to LINE) works a bit differently than WhatsApp. For WhatsApp we upload the content to the WhatsApp servers and then send a message with the content id. However, LINE does not support such functionality. Therefore, we have to provide publicly accessible URLs for accessing the content from the user device. The
LineOutboundContentResourceis needed for this exact reason. In order to access the content we generate a special token secured with the specific Flowable properties that allows accessing that particular content through a special API for a configurable time.
After this has been set, then the REST-Endpoint will be available with the configured Authorization:
GET https://<<LINE-Adapter-URL>>/line-api/content/<<content-id>>".
Additionally, the Flowable application requires the following properties to be set in order to fetch and serve the message attachments from the LINE adapter:
flowable.external-system.line.content.base-content-url=http://<hostname of LINE Adapter>:<port>/line-api/content/
flowable.external-system.line.content.rest-username=<admin username>
flowable.external-system.line.content.rest-password=<admin password>

flowable.external-system.line.outbound-content.enabled=true
flowable.external-system.line.outbound-content.base-content-public-url=https://<publicly accessible LINE Adapter URL>/line-api
flowable.external-system.line.outbound-content.content-token-signing-secret=<custom secret with a length of at least 32 characters>
# How long should the outbound content token be valid
flowable.external-system.line.outbound-content.content-token-expiration-duration=PT1
These configurations enable content, i.e. all other supported message types in addition to text, to be retrieved from LINE. It also allows sending content to LINE by exposing the content through publicly accessible URLs with special token handling.
LINE Adapter Additional Configuration
The LINE Adapter is a Spring Boot application and can be configured by the following properties.
server.port=31332
flowable.adapter.line.webhook-servlet-path=/line-api
flowable.adapter.line.webhook-load-on-startup=-1

spring.activemq.broker-url=tcp://localhost:61616
It runs by default on port 31332 and creates a webhook servlet on the path line_api. The Servlet is lazy-loaded by default, but if no lazy loading is desired, this can be configured by flowable.adapter.line.webhook-load-on-startup=1.
The LINE Adapter uses an ActiveMQ broker for the following inbound and outbound queues (which can be reconfigured to your own requirements).
flowable.adapter.line.jms.inbound-payload-destination=line-inbound-payload
flowable.adapter.line.jms.inbound-message-destination=line-inbound
flowable.adapter.line.jms.inbound-status-destination=line-inbound-status
flowable.adapter.line.jms.inbound-error-destination=line-inbound-error
flowable.adapter.line.jms.outbound=line-outbound

flowable.adapter.line.jms.send-message-wait-duration=PT10S
If the default queue names are changed in the LINE Adapter, it is necessary to also change the Flowable configuration to match the queue names. This can be achieved by the Flowable properties described here.